
Gmail Email Service
Webmail although a good standby, does not have the sophistication of email web services such as Gmail. In contrast Gmail provides a slick interface and 15GB of storage and all for free. Emails need never be deleted to make room for more.
Convenience, related emails are stored in one place. Mail from several different email addresses can also be collected in one Gmail account.
Most hosting companies do not have the infrastructure or resources approaching that of Google. There is always the possibility of hardware failure leading to evaporation of important data. And so it is very wise to keep copies of important or business emails. This method is a painless and efficient way of doing so.
Also, should there be the necessity of having to move website host, the inevitable email entanglement is completely avoided. It is not at all straight forward transferring emails between different hosts.
Requirements
- Google account, sign up links available on Google domains eg https://google.com.
- A custom domain and domain email account with POP3 mailbox (eg [email protected]) in existence, if not, one has to be created. Mail server, port settings and account name and password should be noted, as they are required by Gmail account settings.
Linking Domain Email Account To Gmail
When complete Gmail will read and download mail to the Gmail account. In addition, Gmail can be configured to send mail under the new identity either by using domain mail servers or Gmail’s.
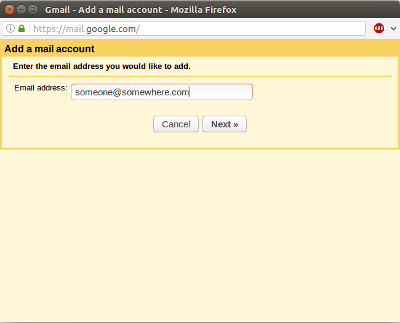
- In the Gmail account open ‘Settings’ (gear wheel drop down, far right at the top of the screen). And then ‘Accounts and Import’ from the top menu bar. Approximately half way down the screen is the menu item ‘Check mail from other accounts:’. Click on the link ‘Add a mail account’ to initiate the account set up. Then an additional screen will request the email address to add. Complete that and follow the next button for the details.
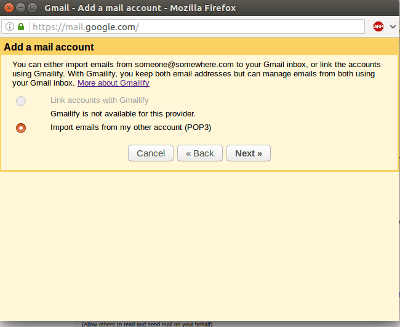
- The next screen offers the choice to link other email services (Gmailify) if available. This is not relevant, continue on with ‘Next’.
- Complete the presented form with username, password, mail server address and port number. These are standard port numbers used in all mail applications. Thereafter there are four options, leave a copy of the message on the server, use secure connection, label incoming messages and archive messages.
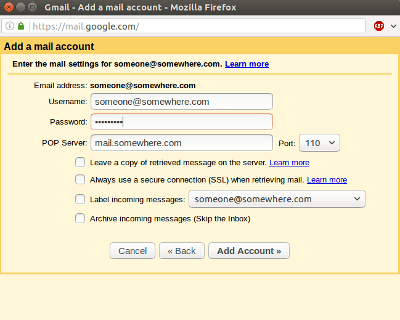
These are all self explanatory but basically. If you are using another mail reading program as well leave copy mails on the server. Always a good idea to use a secure connection. And always handy to have incoming mails labelled. If archiving is chosen mails will skip the inbox and be allocated to the appropriate folder.
Click ‘Add Account’ when complete.
-
When the account has been tested by Gmail as functional the next screen will offer the option to send mail AS IF FROM THE EMAIL ACCOUNT. After the choice of Gmail or domain servers is made then the final step is verification.
-
Gmail will only send mails when the account has been ‘verified’. Click ‘Send verification’ and move on to the next screen. Google will send an email to the elected email address with a digital code. Using an existing mail reader or Webmail open that mail and copy the code. Paste the code into the space on the form and continue with clicking ‘Verify’.
With that final step completed, any email existing on the server for that account will be downloaded and available for reading and any other action. Emails can now be sent from Gmail and the new identity can be set as default sender.